
Solar Mounting Structure Types

Over the world, there is a growing demand for Solar Power panels and mount structures. It is expected that India will become the world’s largest solar nation by 2022, as there is large population growth. The growing demand for solar panels is the cause of a continuous price reduction and higher grating rates. The future of solar power is undeniable as the work performed by them is best when they receive unlimited sunlight for a long duration.
By the term Solar panel mounting structures, we mean that these Solar panel mounting structures are the backbone of solar power plants. These structures provide support to the modules and uplift the solar panels so that they can absorb the maximum solar radiation. Without the existence of Solar panel mounting structures, the solar panels won’t be able to have the minimum amount of solar radiation for optimum solar energy. A perfect mounting structure not only handles the weight of the modules but also they have the capacity to resist extreme weather conditions like floods and storms. These mounting structures are made up of various materials, including wood and polymers, that make them strong.
Types of solar mounting structures
To get better production and efficiency of the solar panels, the right decision must be taken in terms of mounting structures. The investment over mounting structures is a single-time investment, and the decision to purchase must not be taken lightly. There are five types of mounting structures for solar panels:
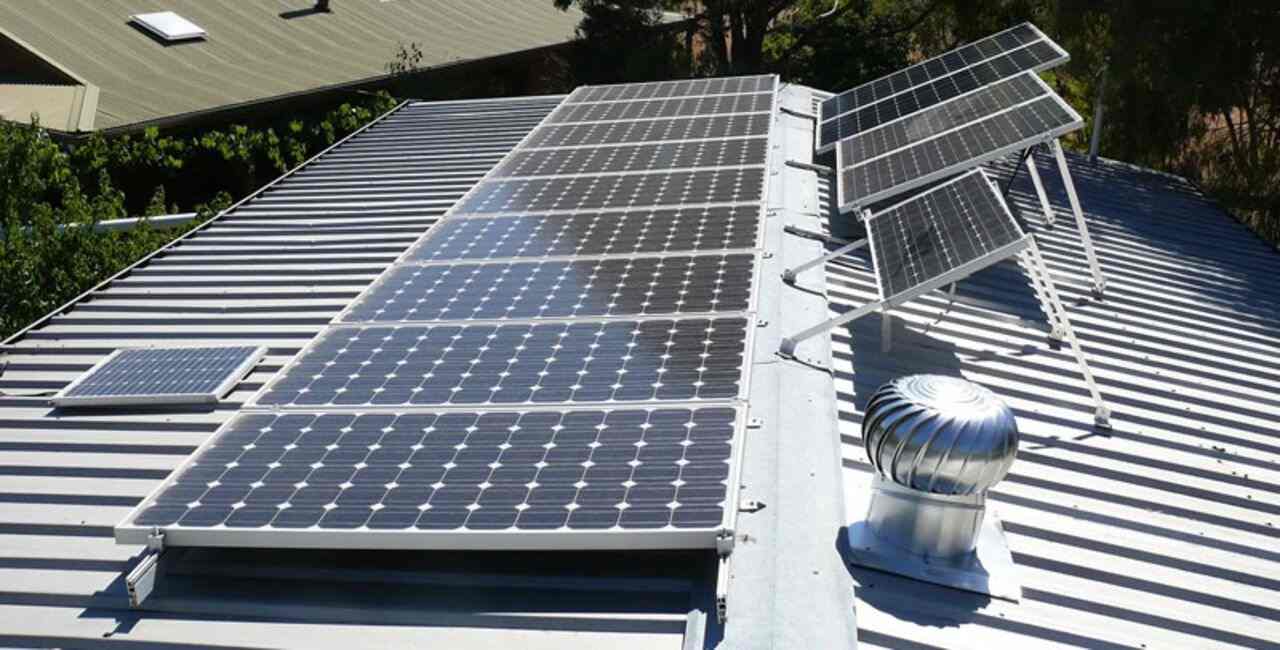
Mounted Roof Racks: These racks help in keeping the wires from running distances between the solar arrays and the inverter to a minimum. The mounted racks require roof penetrations, and that acts as prevention from causing any roof leakages. So, always make sure to have a well-sealed roof. Roof mounts require a large place for the installation of the panels. These solar panels can be fixed or adjusted and installed with solar trackers.
Ground-mounted Racks: Ground-mounted racks are ground-mounted solar structures that are used for the installation of solar panels on the grounds or anywhere in your house. These are adjustable that can be inclined up or down to absorb maximum solar energy at different timing of the day. These types of mounting structures are utilized to secure locations with stable and clean environments.
Top-of-pole-mounted Racks: As the name suggests, these racks are placed on poles. There are two types of mounted poles, one is a top pole, and another is a side pole. Top-pole enables the solar panel to sit on the top of the pole. Whereas the top-pole mounted racks allow the mounting poles to be settled into the ground and are fitted with concrete, and then the solar modules are mounted at the top of the poles.
Side-of-pole-mounted Racks: Here, the solar panels are placed on the side of the pole. They consist of a small number of modules that are used for solar panels. These are specially designed for lighting systems in remote areas and are arrived at your place with the poles where they are easily attached.
Tracking-System Mounted: These mounts are used for all types of solar tracking systems, pumping solar water and allowing maximum sun radiation that produces electricity. There are two types of tracking systems, named one axis and two axes. The one axis helps in tracking the movement of the sun from east to west, while the two axis tracks the movement of the sun on a daily basis. The automated system is inherited in the solar tracker, which helps in tracking the movement of the sun throughout the day for optimum solar energy. Solar trackers increase efficiency, but they are very often used as it is very costly in case of any potential breakdown.
Components Of A Solar Panel Mounting System
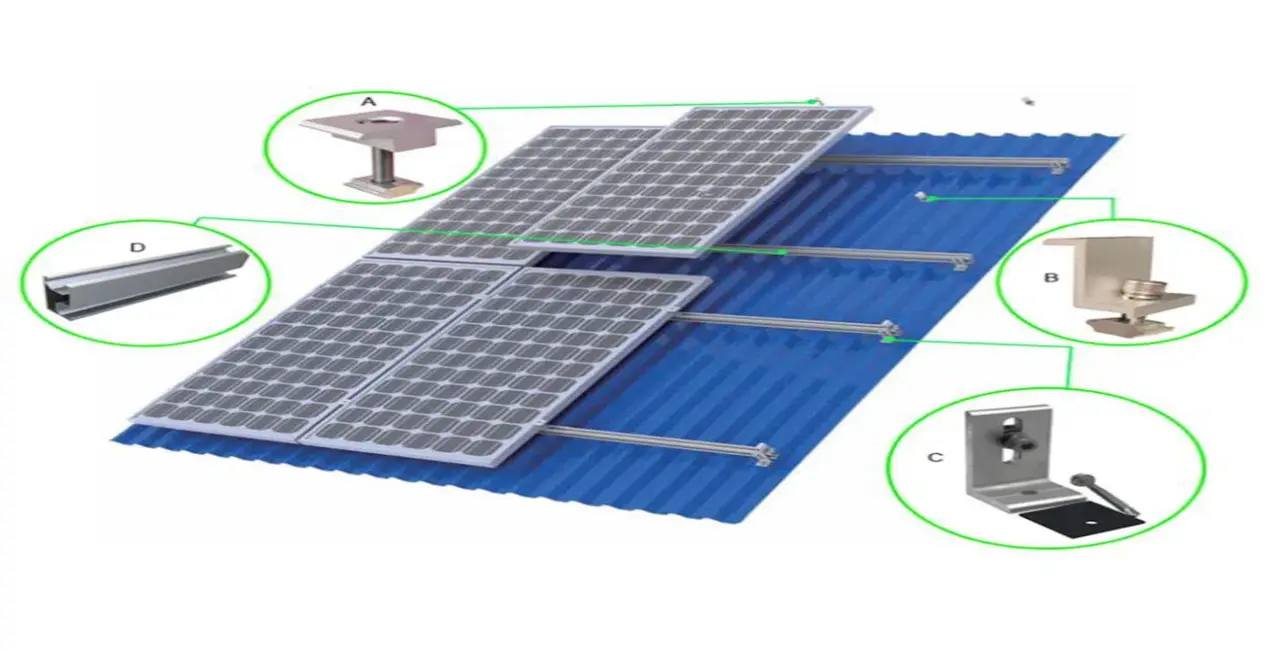
A solar mounting structure consists of various components that can serve as secure connections to the panel. These components include:
SOLAR PANEL MOUNTING BRACKETS
Solar panel mounting brackets are the commonly used components in solar mounting systems. These heavy-duty parts are generally made up of stainless steel or aluminum. Likewise, for any other mounting and racking accessories, these solar panel mounting brackets are also required to severe industry rules and work accordingly.
SOLAR PANEL MOUNTING CLAMPS
Solar panel mounting clamps are the part of rooftop mounting structure. These clamps stay connected to the joints of a solar panel, and with the help of stainless steel set screws, they remain fitted. You can easily design your solar mounting structure using solar rooftop design software.
SOLAR PANEL MOUNTING STRUT CHANNEL
If one wants the assist for the cantilever arm to help assemble the framing of solar panel mounting structures, strut channels are utilized along with rails, clamps, and other fittings. These channels are the interconnection mechanisms that keep the two additives attacked and carry the weight between the two.
SOLAR PANEL MOUNTING SCREW
The solar panel mounting screw plays a vital role in the solar mounting structure. The more will be the number of screws; the more will be the efficiency of the mounting. The angle of the array and the position of the mounting screws determine how much sunlight will be captured and wasted by the panels and their edges, respectively.
How are solar panels attached to the roof
The attachment process of solar panels requires strong tools, techniques, and panel attachments. These attachments help them to stay in place for decades so that they can be safeguarded from natural disasters and other weather conditions. The guidelines have mentioned below for the installation of the solar panel. These guidelines may vary depending on the type of roof.
1. ORGANIZE YOUR MATERIALS
On the very primary basis, make sure everything you’ll need is accessible. All you need to make the installation process complete is a drill, a drill bit, a pencil, a chalk line, a tape measure, and a ladder. The rest of the items must be included in your solar panel shipment.
2. ADJUST THE STANCHIONS
To receive more sunlight, the solar panels must be tilted at least 18 degrees to get better sunlight from the sun. Try to seek a suitable location to set up the stanchions. The stanchions are responsible for supporting the panels, which prevent them from being ripped off of the roof.
The stanchion secures your roof’s rafters because they are very well screwed. If you’re not sure where the rafters are, then you can consult your home’s blueprint.
After the discovery of the rafters, the next step is to install the stanchions on the roof. The distance between the two stanchions should generally be 4 feet. The two stanchions should be fitted to the rafters by drilling holes in them.
3. INSTALL THE FLASHING
After the removal of shingles, place the flashing beneath them. Attach the flashing to the rafters with the help of a bolt.
Once you have drilled a hole, the purpose of the flashing is to keep water away. Along with flashing, the bolts also include a seal that helps to prevent dripping.
4. ATTACH THE RAILS
Insert the screws in the holes and fit them tight. The upper and lower rails are then secured to the stanchions and bolts.
5. ENSURE THE RAILS ARE PARALLEL
The rails must lie parallel to each other. By using a measuring tape, measure the distance between the two rails. The diagonal distance should precisely match. Adjust the rails as per the availability of the surface.
6. PLACE THE MIDDLE RAIL
The middle rail should be placed from one end to the other. Use a tape measure to identify the centre point of the solar.
7. RUN THE WIRES
Take care; a power inverter kit should be set up under each panel. Check again to make sure your solar inverter kits include copper wires. There must be inside and outside connectivity between the panels and solar arrays of these structures.
Take wires from your panels to an electrical meter and a sub-panel.
8. MOUNT THE PANELS
The solar panels can be mounted on the stanchions after the connection of the cables. Retaining clips are then connected to the rails. This procedure will keep your panel in place.
All you need to know about the Solar mounting structure material
The mounting racks can be made up of various types of materials. Before picking any specific material, always make sure to ask the manufacturer about the material of his mounting structures in order to avoid wrong and post-project expensive choices. Aluminum is the highest mounting rack material. Aluminum is not only low weighted but also decreases the weight pressure on the roof, pole or tracking system. It is also corrosion-resistant, strong and compatible with the solar module frames of many manufacturers that are mostly made of Aluminum.
Stainless steel can be yet another choice to choose for the manufacturing of mounting structures. However, stainless steel racks are very strong and resistant to environmental impacts, including hail, snow, rain etc. Stainless steel has a long-lasting feature; they are nevertheless an expensive investment. The mounted racks, which are made up of wood - are cheap and easy to work with but are weak in consistency and bound to fail quickly, particularly in wet environments. Plastics-made mounting racks are also cheap in quality but not the optimal choice in terms of statics and lifetime. Wood and plastic-made material may burn or even break if pressure on the solar panel (e.g. snow) is too high. The iron-made mounting racks are also easy to install and slightly more expensive than wooden racks. It has a feature of corrosion and is not recommendable in wet environments.
Structural integrity is of paramount importance. Just like any other component of a building, solar systems must be sound and secure. There are various types of problems that arise if systems are of low quality or poorly installed. The solar industry is committed to bringing remarkable products and systems to the Indian and global markets. The purpose behind the launch is to enhance solar development across the world. The entry of innovative technologies and products in the sector is improving the way for a cleaner and greener future.
Conclusion
Solar panels can be fitted with the help of solar panel mounting systems either on the roof, pole, or ground.
The cost of installation costs around approximately 10% or more. The mounting system must be efficient, affordable, and practical at the same time.