
What is Site Survey? How ARKA 360 Helps

A Site Survey is done after the preliminary conversation over a phone call. This is the best chance to show them your quality, knowledge, and good service and convert them by doing a professional site survey.
What exactly is a Site Survey?
A Site Survey is done to collect information about various aspects such as local conditions, physical details of the site (including the roof), and the consumer’s power consumption needs. Some of the information collected is:
- Local climatic conditions.
- Physical details of the site (including the roof).
- The consumer’s power consumption needs.
- Shading on the roof and so on.
Site surveys are often done manually by skilled manpower, based on which a 3D model of the site is prepared, which is used for the system design. A site survey consists of an inspection of the area of installation of solar panels to see if the proposed site is suitable. As a solar installer, when checking a potential site, you will primarily check for whether the roof will be able to support the extra load of the solar system, and if during peak hours there is no shade obstructing the panels.
So Why is it Crucial?
While considering installing solar, the site proposed by the customer could be a site the customer is well acquainted with, but you aren’t. However, as an installer, you need to possess key information regarding the site. The information that you accumulate through a site survey should cover all the aspects of the location that influence the solar installation at that particular location.
The main objectives of a site survey are:
- Ensure a site is free from shade due to obstacles such as water tanks, AC units, staircase, etc.
- Clear access for maintenance at the site
- Appropriate orientation to the sun
- Obtain dimensions of the roof structure
- Aesthetics of the installation
- The energy consumption of the consumers.
For example, a software-based shading analysis of the site can save losses incurred due to inefficient generation. Even a little bit of shade can significantly affect the output and efficiency of a solar power system. Electrically, most PV panels are divided into 3 ‘zones’. If you get the shading on just one of those zones then the effect isn’t as bad; however, even partially shading three zones together can lead to a reduction in output of up to 60%. Worse still is if the shading affects both zones at once, for example shading the bottom of the panel. In these cases, even just shading the bottom row of cells would reduce the total power output of the panel by 90-95% of the entire string!
Hence it is crucial to assess the site for all necessary criteria before the installation is done.
What are these criteria?
Let’s say that now you, an installer, have a project in hand and are ready to perform a site survey, there are certain parameters that you need to cover. Here is a list of these essential criteria and why you need them:
Basic information about the site/location:
- Address/Plant Name: For identification
- Latitude and Longitude: For obtaining the satellite image of the site
- Details person at the plant (Name, Designation, E-Mail ID, and Mob No): For contact details
Information regarding the Electrical Energy Sources:
- Sanctioned load from the grid (kVA): Since state policy does not permit more than the specified amount, and varies for different states
- Connected Load
- Installed capacity & voltage of transformers
- Actual connected load (KVA)
- Power Units Consumption per Month / Day
- Average Unit Cost – Grid
Copies of recent electricity bills from consumers are also requested
Information related to the roof/building in the facility:
- Type of roof: Specify if the roof is RCC, metal sheet, or any other
- Roof age (years)
- Roof access available: Whether the roof can be accessed through a ladder or directly.
- Roof height: How many floors high is the roof?
Ensure that all of this data is provided for each roof if there are multiple roofs for a site.
The above data is enough for an RCC roof, which is common across residential and commercial segments.
If the roof considered is a sheet roof, then:
- Roof vendor/Supplier: Specify the name of the company, contact
- Roof material thickness: Measured in mm
- Roof inclination: Measured in angle
- Roof orientation: Direction (e.g. North, Northeast, East, etc.)
- Sheet profile: Trapezoidal, Straight seam, etc
- What is the structure that supports the roof?:
- Is the structure strength adequate? Get DWG
- Roof Penetration allowed? : Yes or No Penetration
- Roof Load withstand capacity (kg/m2): Ask the vendor/supplier if the plant maintenance engineer doesn’t know.
Logistics of the installation
- Material storage space: The modules will be stored over the installation cycle which takes days for small systems to weeks.
- System to take modules etc. to the roof (Staircase, service lift, etc
A clear idea must be obtained on the following too:
A photo can be taken of the following electrical things on the roof for analysis.
- Power evacuation point:
- Roof inclination
- Existing LT Panel
- Existing Earthing & LA Arrangement
Some additional factors that installers must keep in mind:
Along with the given points, you must consider the following points:
If the roof can sustain that much additional weight?
In case your roof is old, needs repair, etc., ensure it is checked before the installation of the PV installation. Also, choose from roof mounting and roof integration.
If there are shaded areas that fall on the solar array during hours of maximum sunlight i.e. 9 am to 4 pm?
Consider the influence of surrounding obstacles such as buildings, neighboring roofs, chimneys, pipes, trees, and hills (natural landmasses, etc.). Also, the length of the shadow during different times of the day and different seasons (winter and summer) is to be considered. This is arguably the easiest thing to do using software, but one that most installers get wrong. You can convince roof owners using shadow simulations and show them how the system will generate electricity.
Is the solar array easily accessible for maintenance purposes?
Ensure that the array is accessible enough for maintenance and installation. In addition to that make sure that you don’t over-utilize the roof area available as that will increase the wind loading of the roof at the edges and not leave space for firefighters to enter in case of a fire. Note whether the roof is accessible from inside the building, has a ladder attached, or there is a need for an external ladder.
If you’ve chosen the correct orientation and tilt of the panels?
As an installer, you must consider the output obtained on average through the year, maximum during the summers and winters. Ensure that if the site is in the northern hemisphere then the roof chosen is one facing the south, and vice versa. To get average yield throughout the year your solar panels should be tilted to an angle equal to the latitude (in degrees) of your location. To get maximum yield in winter, your solar panels should be tilted to an angle equal to the latitude of your location minus 15 degrees, and similarly, for maximum yield in summer, your solar panels should be tilted to an angle equal to the latitude of your location plus 15 degrees.
If you have chosen to mount the panels correctly?
If you choose to mount the panels, ensure you select fitting the conditions mentioned above (orientation, shading, etc.). In addition to that, consider factors such as whether there is a room provided beneath them to ensure cooling if it is ground mounting to check the kind of soil, and if all necessary construction regulations are complied with.
The following are the kinds of mounting:
- (Sloped-) Roof mounting
- Flat roof/ground mounting
- Roof-integrated mounting
- Wall mounting
Where will the other components of the system be situated?
Utilize the site survey to decide the location of various components like the Inverter, Batteries, DC combinator box, AC distribution box, etc. Figure out how far the array will be from the other system constituents. Try to minimize the length of the DC cables between the array and the inverter. Make sure the location is such that the customers can protect the system and the components from theft and vandalism.
What is a solar tracker and how can it be used?
A solar tracker is a device that follows the position and the movement of the sun across the sky and ensures the maximum collection of solar energy by the panels. This can boost the average energy of the panels significantly. Though trackers consume extra power, there is not much additional maintenance cost. Installers are recommended trackers particularly if there is limited space for the array and the consumer wants to extract maximum power from it.
What is the relation between the present electrical system in the building and the solar array?
Through the site survey, you must also gain an understanding of whether the solar panels will connect to the grid. In the case of grid-direct systems, the orientation and tilt angle of the solar array are usually in line with roof orientation and slope. As mentioned earlier, the consumer’s current electricity usage should also be noted.
What ARKA 360 has to offer
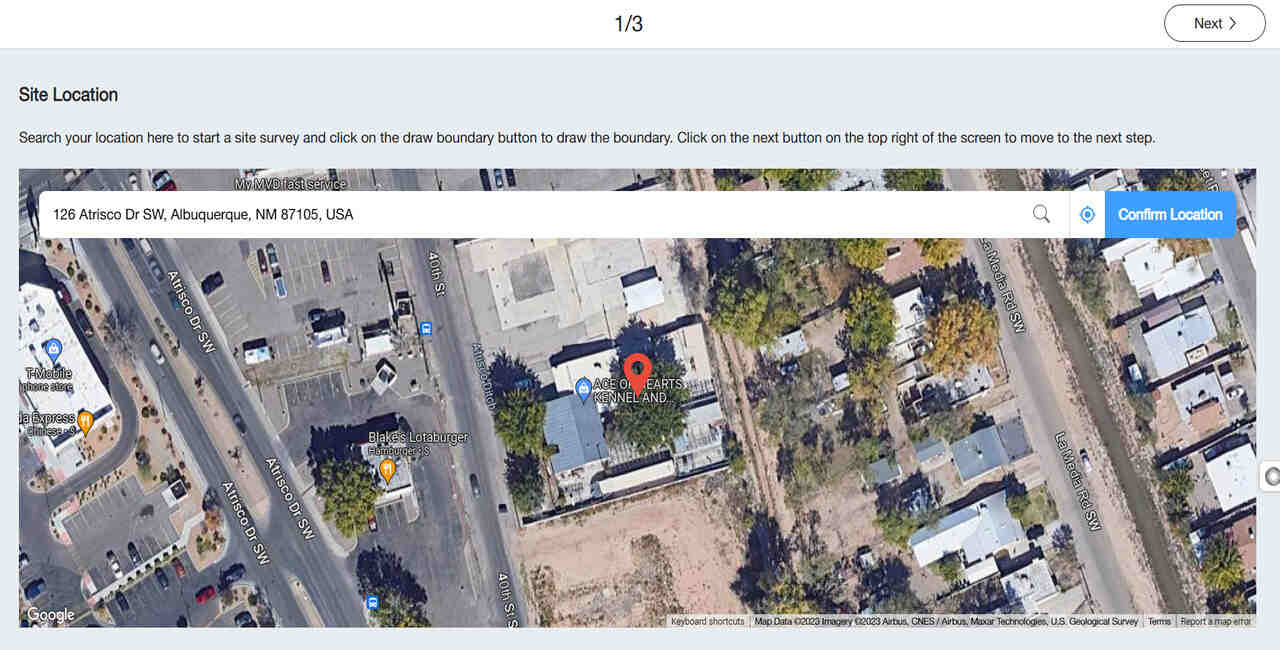
Surveys can be done either in person or virtually for simpler sites. Most companies now prefer to use virtual methods for the initial feasibility analysis since it can provide a great estimate by the use of satellite imaging and save time.
Here at TSL, we use proprietary software that generates a 3D render of the potential area of installation. These renders are created through satellite imaging from Google Maps & ISRO Satellites and it enables us to design accurate systems optimized for a particular area.
The 3D renders assist us in finding any possible obstacles in the area of installation that could cause shadows and after simulating the sun moving around the area, we can find an ideal location for the solar panels.
Thus, through the use of technology, we can whole the process of surveying and simplify your consumer’s transition to solar power. Hence, the site survey aims to provide you with key information, and when combined with the consumer’s requirements, it is what decides the final proposal that will be drafted by you.